
Efficient Spacemesh Mining with Multiple GPUs - Maximize Your Reward

Table of Contents
Introduction
Spacemesh is a groundbreaking cryptocurrency platform that employs an energy-efficient consensus algorithm known as “Proof of Space-Time” (PoST) for mining, presenting an eco-friendly alternative to traditional Proof of Work (PoW) cryptocurrencies like Bitcoin. If you have multiple GPUs and an interest in mining Spacemesh, this comprehensive guide will walk you through the process of maximizing your mining potential using the powerful postcli application.
SpaceMesh Mining Phases & Their Requirements
SpaceMesh’s First Mining Phase: Plotting the Storage
Initiating the Spacemesh mining journey begins with plotting the storage, a critical first step.
- Requirements: A high-performance GPU is essential for optimal plotting, with the GTX 4090 being the fastest option. Note that it typically takes approximately 2 days to plot 1TB. While multi-GPU plotting is not natively supported, innovative community scripts have enabled this capability.
SpaceMesh’s Second Mining Phase: Finding Proof within Existing Storage
Every 14 days, smeshers have an opportunity to uncover proof within existing storage, a process requiring meticulous attention to specific hardware aspects.
Process Overview: The disk is read, and the CPU must locate proof within the storage to qualify for participation and subsequent rewards in the upcoming period. Critical factors include CPU assignment and disk read speeds.
Optimal Hardware: Utilizing a recent Ryzen core allows for efficient handling of this process, achieving a minimum proof of 256GB within one hour. The full window permits 12 x 256GB per CPU core. It’s crucial to ensure that your system boasts adequate write speeds.
Performance Expectations: In an 8-core Ryzen system, anticipate the ability to submit 12TB in 12 hours for a streamlined mining experience.
Prerequisites
Before diving into the mining process, ensure you have the following prerequisites in place:
- Multiple GPUs: Make sure you have at least two GPUs capable of handling Spacemesh mining effectively. Ideally, all of the gpus you use will match. Using odd numbers of gpus is only supported when running the scripts below manually.
- Storage:
- USB 3.0 SATA Drives (100Mb/Sec)
- SATA Drives Internal (200Mb/Sec)
- SSD Drives (500Mb/Sec)
- NVME SSD Drives (3000-7000Mb/sec)
- postcli Application: Download the postcli application from here and ensure it is correctly installed and available in your system’s environment path.
Mining Spacemesh with Multiple GPUs
To begin mining Spacemesh with multiple GPUs, follow these simple steps:
Step 1: Configure Variables
Open a text editor or PowerShell script editor and set the configurable variables according to your requirements.
The provided script already includes some variables you can adjust, but the rest can be pulled from the json or key.bin file that you get when you start smeshing on the spacemech GUI application:
Special Values: These values can be pulled from the
postdata_metadata.jsonfile in the folder when you used go-spacemesh or the gui application.These values can be pulled from the metadata.json file in the folder when you used go-spacemesh or the gui application. However we need to change their encoding.
- Pull the base64 encoded values from the json file and go to this base64 decoder .
- In the encoder, one at a time you’ll convert the node and commitment ids from the metadata.json using text > base64 decode > bytes, hexadecimal, none. The output of this conversion is the value you need.
Note: We now convert them for you in the windows version of the script. If you have the old version, the linux version, or would like to learn more, please see the video above.
$commitmentAtxId: Replace this with your commitment ATX ID, a unique identifier for your commitment to participate in the Spacemesh network. Must be converted from yourpostdata_metadata.jsonfile with the instruction above if using linux, otherwise please copy directly from the json file.$nodeId: Replace this with your Node ID. Must be converted from yourpostdata_metadata.jsonfile with the instruction above if using linux or using the last 64 characters in yourkey.binfile, otherwise please copy directly from the json file.
Standard Values These values can be changed manually to whatever you want. Use common sense. Select the number of gpus and copy and paste the values if they are different from the
postdata_metadata.jsonfile.$numGpus: Set the number of GPUs you want to utilize for mining. For instance,2for two GPUs.$LabelsPerUnit: Set the number of labels per storage unit. The default value is4294967296.$MaxFileSize: Set the maximum file size. The default value is2147483648.$numUnits: Set the number of storage units to mine. The default value is16. Eachnumis equivalent to 64 GigaBytes in plot space.$datadir: Set the path to the data directory where your mining data will be stored.$postcliPath: Set the exact path to yourpostcli.exeexecutable.
Step 2: Execute the Script
Save the script with the defined variables and execute it in PowerShell. The script will automatically divide the mining workload among the specified GPUs, optimizing mining efficiency.
Windows
## Configurable Variables
$numGpus = 2
$commitmentAtxId = ""
$nodeId = ""
$LabelsPerUnit = 4294967296
$MaxFileSize = 2147483648
$numUnits = 16
$datadir = "C:\root\post\data"
$postcliPath = "S:\postcli.exe" #This should be the full path to the postcli.exe executable.

####################################
# Convert data coppied from postdata_metadata.json. DO NOT MODIFY
try{
    # Decode Base64 to Bytes
    $commitmentAtxIdBytes = [System.Convert]::FromBase64String($commitmentAtxId)
    # Convert Bytes to Hex
    $commitmentAtxIdHex = -join ($commitmentAtxIdBytes | ForEach-Object { $_.ToString("X2") })
    # Take the first 64 characters (32 bytes)
    $commitmentAtxId = $commitmentAtxIdHex.Substring(0, 64)
    # Display the conversion results
    Write-Output "CommitmentAtxId after conversion: $commitmentAtxId"
}
Catch{
    Write-Output "Unable to convert CommitmentAtxId, trying to pass in as is..."
    $commitmentAtxId = $commitmentAtxId
}

try{
    # Convert NodeId from hexadecimal to bytes
    $nodeIdBytes = [System.Convert]::FromBase64String($nodeId)
    # Convert Bytes to Hex
    $nodeIdHex = -join ($nodeIdBytes | ForEach-Object { $_.ToString("X2") })
    # Take the first 64 characters (32 bytes)
    $nodeId = $nodeIdHex.Substring(0, 64)
    # Display the conversion results
    Write-Output "NodeId after conversion: $nodeId"
    ####################################
}
Catch{
    Write-Output "Unable to convert nodeId, trying to pass in as is..."
    $nodeId = $nodeId
}

$countBy = ($numUnits * 32) / $numGpus
$rangeCount = $numGpus
Write-Output "If done manually, you can do the following ranges"

for ($i = 1; $i -le $rangeCount; $i++) `
{
    $rangeStart = ($i - 1) * $countBy
    $rangeEnd = $rangeStart + $countBy - 1

    Write-Output "Range $i fromFile = $rangeStart, toFile = $rangeEnd"
}

foreach ($gpuIndex in 0..($numGpus - 1)) {
    # Calculate the range of files for each GPU with the completed offset
    $fromFile = [int][math]::floor(($gpuIndex * ($numUnits * 32 / $numGpus)) + $completedOffset)
    $toFile = [int][math]::floor((($gpuIndex + 1) * ($numUnits * 32 / $numGpus)) - 1 + $completedOffset)

    Start-Process -FilePath "$postcliPath" -ArgumentList "-provider $gpuIndex", "-commitmentAtxId", $commitmentAtxId, "-id", $nodeId, "-labelsPerUnit", $LabelsPerUnit, "-maxFileSize", $MaxFileSize , "-numUnits", $numUnits, "-datadir", $datadir, "-fromFile", $fromFile, "-toFile", $toFile
}
Manual Windows Spacemesh Script Modification
If you all want to calculate the ranges manually to troubleshoot and get more visibility you can comment out or remove the foreach loop in the script above and it’ll just print the ranges for you to run the above script manually.
Which should get you something like:
If done manually, you can do the following ranges
Range 1 fromFile = 0, toFile = 511
Range 2 fromFile = 512, toFile = 1023
Then you can take the start-process command in foreach loop and cut it out of the for each block,
manually set the provider number and fromFile and toFile values needed and paste them manually into different terminals.
This also lets you plot one plot on multiple systems if you take advantage of network storage.
Start-Process -FilePath "$postcliPath" -ArgumentList "-provider 0", "-commitmentAtxId", $commitmentAtxId, "-id", $nodeId, "-labelsPerUnit", $LabelsPerUnit, "-maxFileSize", $MaxFileSize , "-numUnits", $numUnits, "-datadir", $datadir, "-fromFile", 0, "-toFile", 511
Start-Process -FilePath "$postcliPath" -ArgumentList "-provider 1", "-commitmentAtxId", $commitmentAtxId, "-id", $nodeId, "-labelsPerUnit", $LabelsPerUnit, "-maxFileSize", $MaxFileSize , "-numUnits", $numUnits, "-datadir", $datadir, "-fromFile", 512, "-toFile", 1023
Linux
#!/bin/bash

# Configurable Variables
numGpus=2
commitmentAtxId=""
nodeId=""
LabelsPerUnit=4294967296
MaxFileSize=2147483648
numUnits=16
datadir="\root\post\data"

# Script
for ((gpuIndex=0; gpuIndex<numGpus; gpuIndex++)); do
    fromFile=$((gpuIndex * (numUnits * 32 / numGpus)))
    toFile=$(( (gpuIndex + 1) * (numUnits * 32 / numGpus) - 1 ))

    postcli -provider $gpuIndex -commitmentAtxId "$commitmentAtxId" -id "$nodeId" -labelsPerUnit $LabelsPerUnit -maxFileSize $MaxFileSize -numUnits $numUnits -datadir "$datadir" -fromFile $fromFile -toFile $toFile &
done
Step 2.5: Optional Advanced - Execute the Script
Advanced Linux
Advanced Linux Script
#!/bin/bash

# Configurable variables
desiredSizeGiB=1024 # 1TIB
datadir="/root/post/data"
commitmentAtxId=""
nodeId=""

## Automatic Values
desiredSizeBytes=$(($desiredSizeGiB * 1024 * 1024 * 1024))
numGpus=$(nvidia-smi --query-gpu=name --format=csv,noheader | wc -l)
numGpus=$(($numGpus + 0)) # convert to int
LabelsPerUnit=4294967296
MaxFileSize=2147483648
numUnits=$(($desiredSizeGiB / 64))           # 64 GiB per unit
numUnits=$(($numUnits + 0))                  # convert to int

# Script to run postcli for each GPU
for ((gpuIndex=0; gpuIndex<numGpus; gpuIndex++)); do
    fromFile=$((gpuIndex * (numUnits * 32 / numGpus)))
    toFile=$(( (gpuIndex + 1) * (numUnits * 32 / numGpus) - 1 ))

    postcli -provider $gpuIndex -commitmentAtxId "$commitmentAtxId" -id "$nodeId" -labelsPerUnit $LabelsPerUnit -maxFileSize $MaxFileSize -numUnits $numUnits -datadir "$datadir" -fromFile $fromFile -toFile $toFile &
done
Step 3: Monitor Mining Progress
Once the script is running, you can monitor the mining progress. The postcli application will start utilizing the specified GPUs to mine Spacemesh using the PoST algorithm. Each GPU will be assigned a specific range of storage units to ensure fair distribution of work.
Spacemesh Calculator: Optimizing Your Mining Potential
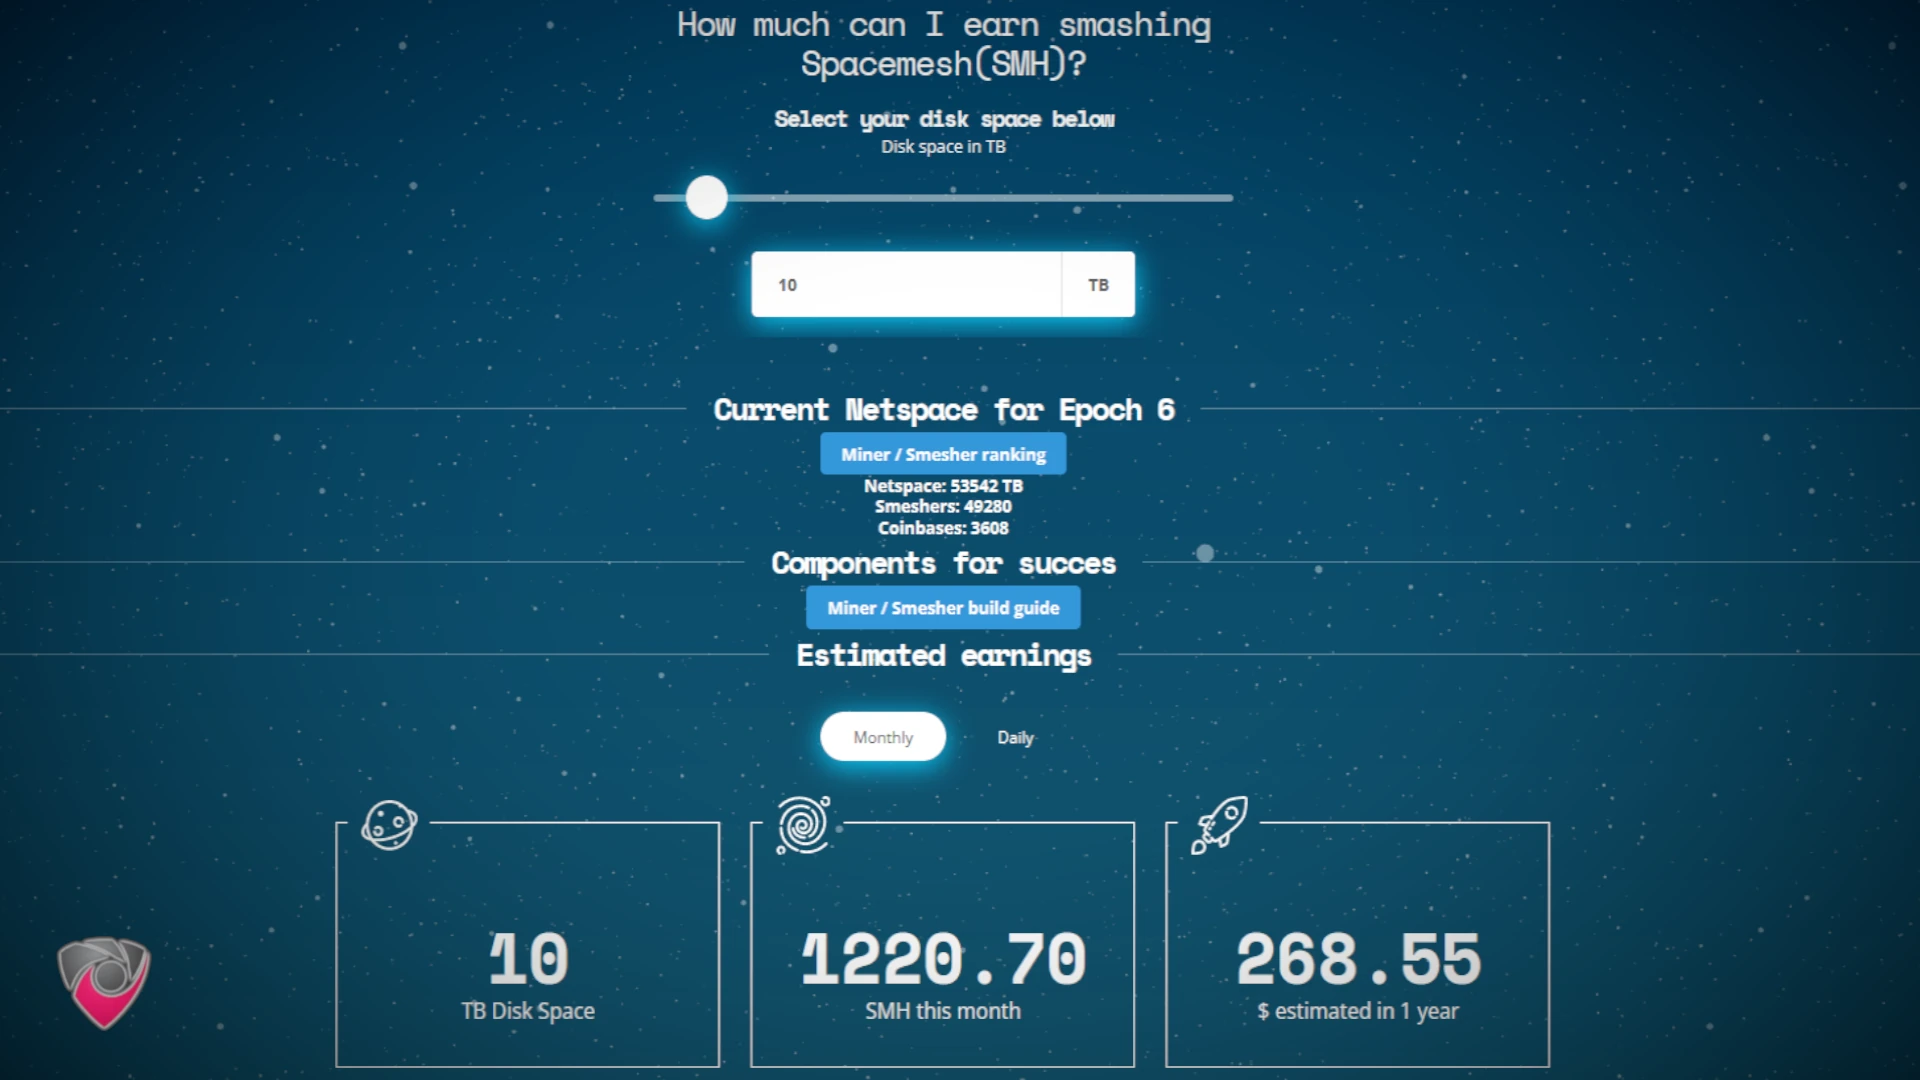
The Spacemesh Calculator serves as an indispensable tool for individuals venturing into Spacemesh (SMH) mining. Designed to streamline the mining experience, this calculator enables users to input their chosen disk space and receive detailed estimates of potential monthly and daily earnings in SMH. By factoring in crucial data such as current Netspace, Smesher ranking, and Coinbases, the calculator provides insights into the competitive landscape of Spacemesh mining. Notably, it considers hardware specifications, offering recommendations on GPU choices and plotting times. This dynamic tool plays a pivotal role in preparing prospective miners for the evolving landscape of decentralized cryptocurrencies, providing valuable insights into potential earnings within the Spacemesh network.
Conclusion
Mining Spacemesh with multiple GPUs is an efficient way to contribute to the network while maximizing your hardware potential. By employing the provided PowerShell script alongside the postcli application, you can seamlessly mine Spacemesh using the PoST algorithm without the energy-intensive computations required by PoW-based cryptocurrencies.
Always remember to keep your postcli application up to date and stay informed about any changes or updates to the Spacemesh network. Happy mining!
References
- Spacemesh Official Website
- Spacemesh GitHub Repository
- Spacemesh POST CLI Application
- Spacemesh Start
- Spacemesh FAQ
- SpaceMeshOS GPU Post
Disclosure and Affiliate Statement:
Affiliate Disclosure: We may earn a commission from links on this page. These commissions support our website and the content we provide. Rest assured, we only recommend products/services we believe in. Thank you for your trust! Click Here to Learn More
Related Posts


This article refers to other articles we've written:
- Spacemesh Mining: The Eco-Friendly Path to Decentralized Rewards
Earn eco-friendly rewards through Spacemesh mining, a decentralized approach using the innovative PoST consensus algorithm.