

Quadruple Mining DePin GPS Projects: Geodnet, Onocoy, RTKDirect, and FrysCrypto

Table of Contents
Introduction
Welcome to the forefront of GPS precision – a realm where innovation meets DIY enthusiasm. In this comprehensive guide, we’ll delve into the exciting realm of triple mining, bringing together the powerful forces of Geodnet, Onocoy, and RTKDirect. Join us on a journey where technology meets customization, and global navigation takes a leap forward. Whether you’re a DIY enthusiast or a tech-savvy navigator, this guide is your gateway to revolutionizing your GPS experience.
Note: This article doesn’t contain nor should it be represented as an endorsement of any of the projects mentioned nor as financial advice. This article is for educational purposes only.
Hardware Requirements:
Hardware Recommendations
For this project we need a few things.
- Geodnet Miner
- Any system running linux
- A UM980 or Mosaic-X5 Based GPS Receiver
- A GPS Antenna (You can use the one that came with your geodnet device)
- A really good Power Blocking Antenna Splitter
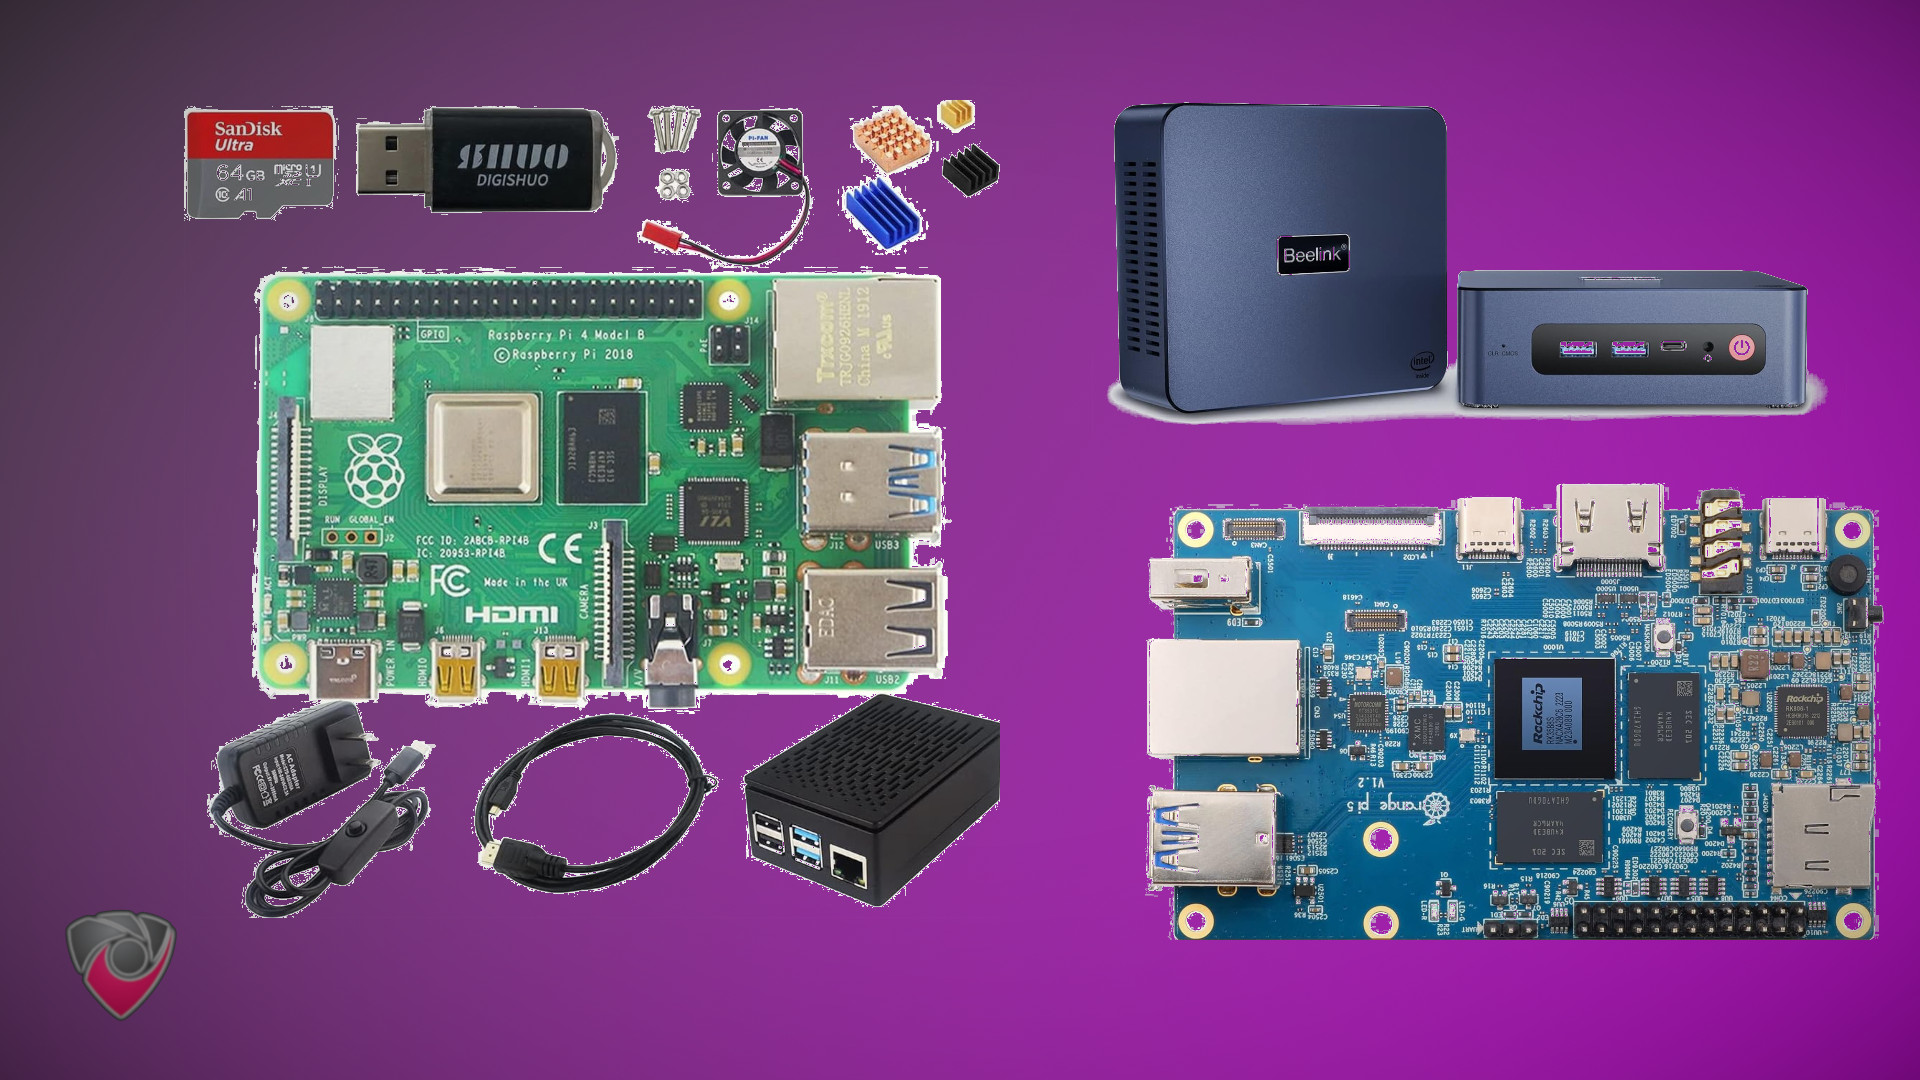
Raspberry Pi and Pi Clones:
Hard to get ahold of these days but they are super low power and are quite customizable. For info on how to install Raspbian on your Raspberry Pi:
Any Mini PC with Intel N5100 or similar
For a super low power Raspberry Pi equivalent but on an x64 platform:
Ultra Low Power / Low Budget
Compute Notable Mentions
Older Raspberry Pi models (1, 2, 3) should be sufficient. But newer models should be significantly more efficient and allow you do run multiple low powered mining setups on a single device. This is why we recommend newer compute hardware.
Recommended GPS Receivers DIY RTKDirect Deployments
There are many receivers on the market but at a bare minimum it must support RTCM (Radio Technical Commission for Maritime Services) and ideally have the ability to be hooked up to an antenna outside of the install location with 360 degree unobstructed view of the sky.
These are all going to be devices that are Triple-Band, High Pull Rate, Extreme Position Receivers. Most won’t support USB. They will require PCI-E, UART, I2C, or Serial Connections. THey will allow you to be capable of at most of the RTKDirect rewards. While you’ll be able to use the same software we mention below, the instructions we’ve provided may not exactly line up. Be advised that things like COM ports and the dongle specific instructions may be different for you.
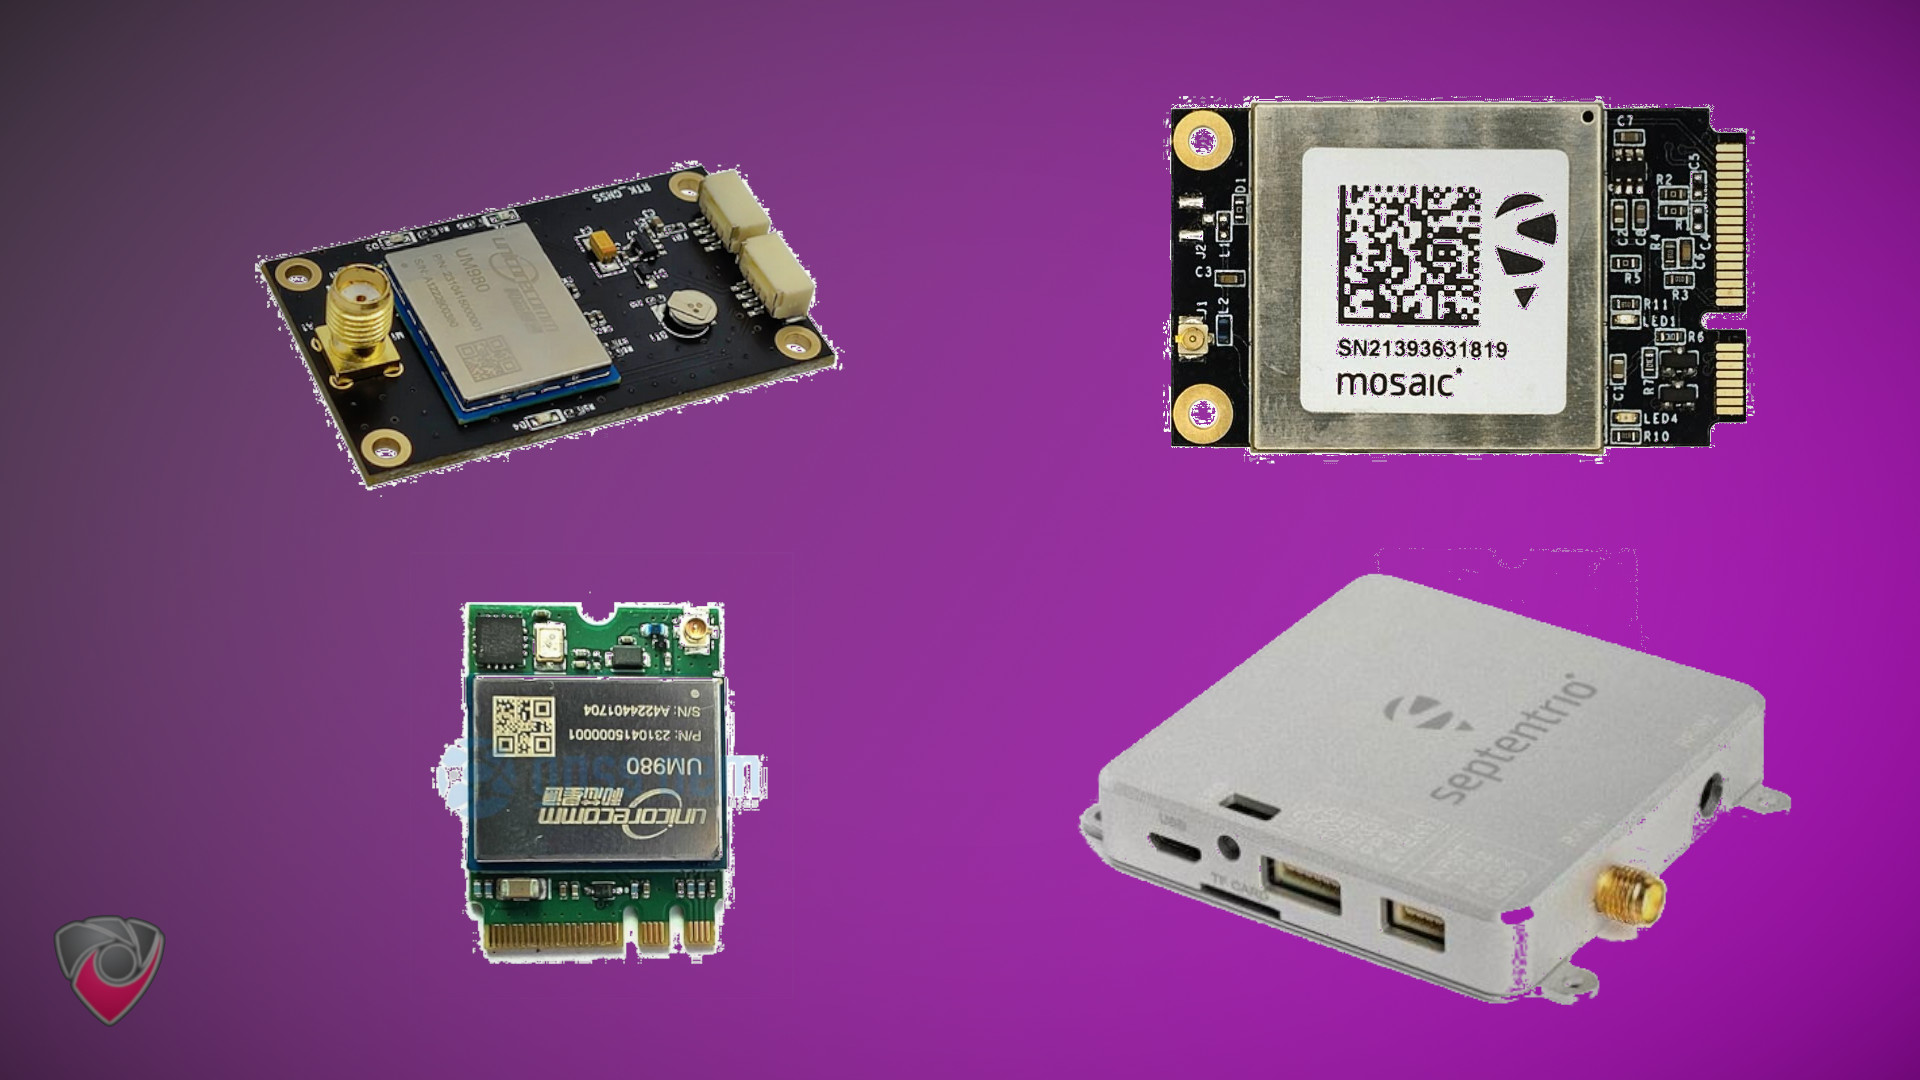
| Model | Description |
|---|---|
| mosaic-go GNSS module receiver evaluation kit | Septentrio Mosaic X5 Based, 50-100Hz Pull Rate, Anti-Interference, Anti-Jamming, Anti-Spoofing. Firmware update required. |
Recommended Antennas
We’ve covered this in a more in depth guide about the Best GPS Base Station Antennas .

Recommended Antenna Splitters
When choosing antenna splitters for your setup, it’s crucial to avoid options that may harm your radios, such as the one linked here . This type of splitter can potentially damage your equipment.
Instead, consider opting for antenna splitters that intelligently split the signal without affecting the DC power.
Here are two recommended options:
These alternatives provide a reliable solution for signal splitting without the risk of damaging your equipment.
OS Installation:
We won’t go into the technical details of how to install an operating system here. However here are some great resources to get you started.
Raspbian:
Ubuntu:
- Install Ubuntu desktop
- Ubuntu Server - Basic installation
- Ubuntu Complete Beginner’s Guide: Download & Installing Ubuntu
Triple Mining Setup Instructions
Wiring
You’ll take the Power Blocking GPS Splitter and split your antenna connection going between the Geodnet MobileCM Miner and whatever GPS Receiver you have connected to your Linux system .
Wiring Diagram
Geodnet MobileCM Miner <—–> Power Blocking GPS Splitter <—–> Antenna
Linux System <—> GPS Receiver <—–> Power Blocking GPS Splitter
Linux - Docker Container
1. Install Docker
Consult the following guides for more information on how to install docker
- https://www.digitalocean.com/community/tutorial-collections/how-to-install-and-use-docker
- https://docs.docker.com/engine/install/
- https://docs.docker.com/engine/install/ubuntu/
2. Run the Docker Container
Run our Docker container , ensuring that you provide the necessary environment variables and parameters:
> You don't have to specify both Onocoy and RTKDirect credentials. The backend script is smart and looks to see if they have been set. You can use one or both and this should function perfectly.
docker run \
  -td \
  --restart unless-stopped \
  --name sosrtk \
  --device=/dev/<YOUR_USB_PORT> \
  -e USB_PORT=<YOUR_USB_PORT> \
  -e BAUD_RATE=<YOUR_SERIAL_BAUD_RATE> \
  -e DATA_BITS=<YOUR_SERIAL_DATA_BITS> \
  -e PARITY=<YOUR_SERIAL_PARITY> \
  -e STOP_BITS=<YOUR_SERIAL_STOP_BITS> \
  -e ONOCOY_USERNAME=<YOUR_ONOCOY_MOUNTPOINT_USERNAME> \
  -e PASSWORD=<YOUR_ONOCOY_MOUNTPOINT_PASSWORD> \
  -e PORT_NUMBER=<YOUR_RTKLIB_PORT_NUMBER> \
  -e LAT=<OPTIONAL_YOUR_LATITUDE> \
  -e LONG=<OPTIONAL_YOUR_LONGITUDE> \
  -e ELEVATION=<OPTIONAL_YOUR_ELEVATION_FROM_SEA_LEVEL_IN_METERS> \
  -e INSTRUMENT=<OPTIONAL_YOUR_GPS_RECEIVER_DESCRIPTION> \
  -e ANTENNA=<OPTIONAL_YOUR_ANTENNA_DESCRIPTION> \
  simeononsecurity/docker-rtklib-onocoy-rtkdirect:latest
Ensure you replace the placeholder values (<...>) with your specific configuration.
Ex.
docker run \
 -td \
 --restart unless-stopped \
 --name sosrtk \
 --device=/dev/ttyUSB0 \
 -e USB_PORT=ttyUSB0 \
 -e BAUD_RATE=921600 \
 -e DATA_BITS=8 \
 -e PARITY=n \
 -e STOP_BITS=1 \
 -e ONOCOY_USERNAME=your_onocoy_mountpoint_username \
 -e PASSWORD=your_onocoy_mountpoint_password \
 -e PORT_NUMBER=32377 \
 -e LAT=37.7749 \
 -e LONG=-122.4194 \
 -e ELEVATION=50 \
 -e INSTRUMENT="Your GPS Receiver" \
 -e ANTENNA="Your Antenna" \
 simeononsecurity/docker-rtklib-onocoy-rtkdirect:latest
Linux - Manually
1. Install RTKBase
cd ~
wget https://raw.githubusercontent.com/Stefal/rtkbase/master/tools/install.sh -O install.sh
chmod +x install.sh
sudo ./install.sh --all release #must not be run as root
#RTKbase comes with a web element that doesn't work for our purposes.
sudo systemctl disable rtkbase_web
sudo systemctl stop rtkbase_web
or if you’re on Ubuntu specifically
sudo apt install -y rtklib
2. Set up STR2STR
- Test Set up USB to local TCP server
Note: When setting up USB to a local TCP server using the
str2strcommand, ensure you specify your serial settings correctly. In the provided example:
str2str -in serial://ttyUSB0:921600:8:n:1#rtcm3 -out tcpsvr://:5015 -b 1 -t 0
- ttyUSB0: Specifies the USB port. Adjust this based on your system configuration.
- 921600: Represents the baud rate. Modify this value if your device requires a different baud rate. Another common baud rate for GPS receivers is
115200. - 8: Indicates the data bits.
- n: Represents no parity.
- 1: Indicates one stop bit.
Make sure to customize these settings according to your specific hardware and communication requirements.
For those who aren’t following my guide exactly and are using a standalone NTRIP device, like the NTRIP-X or Ardusimple Devices with the Wifi Master, or have followed our ESP32 guide, you’ll end up doing something like the following
str2str -in ntrip://your-ntrip-source-here#rtcm3 -out tcpsvr://:5015#rtcm3in combination with a service like Emlid Caster . Play around with the--help. You goal should be to take NTRIP in and do local TCP out. Unfortunately the two software packages available for Linux don’t let you take in NTRIP in as a caster directly, so we have to go through a middle man and access it as a NTRIP client.
- Test Set Up TCP Forwarding to RTKDirect
You’ll need the IP and portnumber from the RTKDirect Console .
str2str -in tcpcli://localhost:5015#rtcm3 -out tcpcli://ntrip.rtkdirect.com:portnumber#rtcm3 -msg "1006(30), 1008(30), 1012(30), 1033(30), 1077, 1087, 1097, 1107, 1117, 1127, 1137, 1230" -p lat long elevation(m) -i "SimeonOnSecurity UM980 RTKLIB DIY" -a "GEODNET ANTENNA" -t 0
Notes:
- Be sure to replace the message numbers if you know you don’t use MSMv7 RTCM3 messages . Otherwise, don’t touch them.
- Be sure to replace the values for -p, -i, and -a with your, geo cords, receiver model and your antenna if applicable. If you don’t know them, omit this information from the command.
- Elevation relative to sea level in meters.
- Use tools like gps-coordinates.net to get your coordinates and FreeMapTools to get your elevation.
- Under
-outbe sure to specify the port number the dashboard gives you.- The IP provided in the dashboard, at least for now, is the same as
ntrip.rtkdirect.com. They point to the same space.
- The IP provided in the dashboard, at least for now, is the same as
- Test Set Up NTRIPv1 for Onocoy
You’ll need the Mountpoint Username and Password from the Onocoy Console
str2str -in tcpcli://localhost:5015#rtcm3 -out ntrips://:[email protected]:2101/username#rtcm3 -msg "1006(30), 1033(30), 1077, 1087, 1097, 1117, 1127, 1137, 1230" -p lat long elevation(m) -i "SimeonOnSecurity UM980 RTKLIB DIY" -a "GEODNET ANTENNA" -t 0
Notes:
Be sure to replace the message numbers if you know you don’t use MSMv7 RTCM3 messages . Otherwise, don’t touch them.
Be sure to replace the values for -p, -i, and -a with your, geo cords, receiver model and your antenna if applicable. If you don’t know them, omit this information from the command.
Elevation relative to sea level in meters.
Use tools like gps-coordinates.net to get your coordinates and FreeMapTools to get your elevation.
Under
-outbe sure to specify the password and username number the onocoy console gives you.
- Set Up STR2STR SYSTMCTL Services
To make sure that it starts up on boot, we need to create a service.
Using the commands we created earlier, you’re going to create two services. Use the commands and template below to do that.
Set Up TCP Server Service
sudo nano /etc/systemd/system/rtkdirect-str2str1.service[Unit] Description=STR2STR Service 1 After=network.target Wants=network-online.target After=network-online.target [Service] ExecStart=str2str -in serial://ttyUSB0:921600:8:n:1#rtcm3 -out tcpsvr://:5015 -b 1 -t 0 Restart=always RestartSec=30 StartLimitBurst=10 StartLimitInterval=5min TimeoutStartSec=600 User=root [Install] WantedBy=default.targetSet Up RTK Direct TCP CLient Service
sudo nano /etc/systemd/system/rtkdirect-str2str2.service[Unit] Description=STR2STR Service 2 After=network.target Wants=network-online.target After=network-online.target [Service] ExecStart=str2str -in tcpcli://localhost:5015#rtcm3 -out tcpcli://ntrip.rtkdirect.com:portnumber#rtcm3 -msg "1006(30), 1008(30), 1012(30), 1033(30), 1077, 1087, 1097, 1107, 1117, 1127, 1137, 1230" -p lat long elevation(m) -i "SimeonOnSecurity UM980 RTKLIB DIY" -a "GEODNET ANTENNA" -t 0 Restart=always RestartSec=30 StartLimitBurst=10 StartLimitInterval=5min TimeoutStartSec=600 User=root [Install] WantedBy=default.targetSet Up Onocoy NTRIP v1 Service
sudo nano /etc/systemd/system/rtkdirect-str2str3.service[Unit] Description=STR2STR Service 3 After=network.target Wants=network-online.target After=network-online.target [Service] ExecStart=str2str -in tcpcli://localhost:5015#rtcm3 -out ntrips://:[email protected]:2101/username#rtcm3 -msg "1006(30), 1033(30), 1077, 1087, 1097, 1107, 1117, 1127, 1137, 1230" -p lat long elevation(m) -i "RTKBase UM980,2.4.2" -a "GEODNET ANTENNA" -t 0 Restart=always RestartSec=30 StartLimitBurst=10 StartLimitInterval=5min TimeoutStartSec=600 User=root [Install] WantedBy=default.targetEnable and start the services.
sudo systemctl daemon-reload
sudo systemctl enable rtkdirect-str2str1 rtkdirect-str2str2 rtkdirect-str2str3
sudo systemctl start rtkdirect-str2str1 rtkdirect-str2str2 rtkdirect-str2str3
Windows
Please see the
Windows instructions for Onocoy instructions
, use STR2SRV to output to one NTRIPServer for onocoy and one tcpclient for RTKDirect.
Bonus: Quadruple Mining with FrysCrypto DIY GPS Miner(Windows Required)
Note: We do not recommend doing anything with FrysCrypto. Don’t invest anything you aren’t willing to lose.
Note: This section is not tested as far as we’d normally like. We had a few readers suggest this configuration. Your milage may very. We’ll update this as we learn more and improve on it.
This part gets a bit complicated. You’ll likely need to install your UM980 using the Linux instructions . Then, you’ll need to run the following instructions on a system running Windows:
- First download and install the
Outdoor Sattlite Miner Alpha Download
from the FryFoundation Website. This will install python, a python script, a batch script, and
U-Blox’s U-Center 2
.
- When you’re setting it up, it’ll ask for your algorand wallet’s private key, please make sure you create a dedicated algorand wallet for this purpose. Do not use your existing wallet.
- Download and install
com0comfrom the Null-modem Emulator project.- Use all the default options and hit next until the last page, then click “Open Setup” and next one last time.
- Remove all non COM devices.
- Take note of the preconfigured COM device names. We got
COM3andCOM4
- Use all the default options and hit next until the last page, then click “Open Setup” and next one last time.
- Download and install
HW VSP3 - Virtual Serial Port
.
- You only need the single-port version
- On the Virtual Serial Port Tab
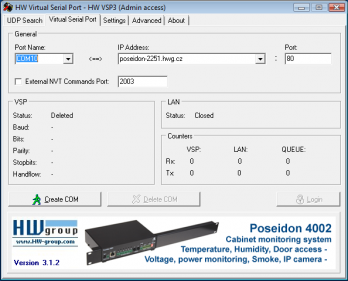
- Specify the
COM PORTfrom com0com,IPandPort Numberof the RTKLIB or Docker Based TCP server and clickCreate COM
- Open
U-Blox’s U-Center 2
and on the second tab you’ll see an option to “Add Device”.
- Click “Add Device” and select the com port you created during the
com0comsetup and selected inHW VSP3.. - You should see data coming into U-Center after a few seconds.
- Click “Add Device” and select the com port you created during the
- Lastly, don’t forget to register your BYOD Outdoor Satellite Miner
Credit to @Arco in the Onocoy discord for helping us link together the final pieces.
Conclusion
As we conclude our exploration into triple mining with Geodnet, Onocoy, and RTKDirect, envision a world where GPS precision is not just a necessity but a customizable, cost-effective, and rewarding adventure. The DIY spirit intertwines with cutting-edge technology, creating a tapestry of possibilities for navigation enthusiasts worldwide. The journey doesn’t end here – it’s an ongoing revolution. Unleash the potential of your GPS navigation, contribute to a global network, and embrace the future of geolocation. Precision awaits; your adventure begins now!
References
- RTKDirect Official Website
- RTKDirect About Page
- Onocoy - Get GNSS correction data
- Onocoy - Connect your station to onocoy
- RTKLIB.com
- str2str
Disclosure and Affiliate Statement:
Affiliate Disclosure: We may earn a commission from links on this page. These commissions support our website and the content we provide. Rest assured, we only recommend products/services we believe in. Thank you for your trust! Click Here to Learn More
Related Posts


This article refers to other articles we've written:
- Quadruple Mining DePin GPS Projects: Geodnet, Onocoy, RTKDirect, and FrysCrypto
Embark on a GPS revolution! Discover DIY triple mining with Geodnet, Onocoy, and RTKDirect for enhanced precision. Join a global network and save costs. Explore the future of navigation now!
- DIY Onocoy Ntrip Server and Reference Station Setup
Discover how to effortlessly set up a DIY GPS Onocoy Reference Station for precise location accuracy. Learn step-by-step with affordable hardware options and reliable receivers.
- Unlock Precision: Build Your DIY RTKDirect Reference Station Today!
Explore DIY RTKDirect setup for enhanced GPS precision. Save costs, customize, and join a global network. Ready to revolutionize your navigation?
- Build a Profitable Passive Income Box with Low-Powered Hardware: A Guide
Learn how to set up a low-powered passive income crypto miner using a Raspberry Pi or Intel NUC, and earn $10-$20 per month per box with this guide
- Budget DIY GPS/GNSS Base Station / Receiver and NTRIP Server Client with ESP32 and UM980
Effortlessly set up a budget DIY GPS/GNSS base station and NTRIP Server / NTRIP Client using ESP32 and the Unicorecomm UM980 for accurate positioning.
- Unlocking Precision: Onocoy's Supported RTCM Messages
Discover how Onocoy supports RTCM messages, enhancing location accuracy.
